• Skip to primary navigation
  • Skip to main content
  • PRICE LISTS
    • PRICE LIST: NAILS
    • PRICE LIST: MAKE-UP
  • CONTACT
  • SHOP
  • TESTIMONIALS
  • FAQ
    • Nails FAQ
    • Make-up FAQ
  • T&Cs
    • Refund and Returns Policy
    • Terms & Conditions
  • Nav Social Menu

    • Facebook
    • Instagram
    • Pinterest
  •  

Rambling Rose

  • Price Lists
    • Nails
    • Make-up
  • Shop
  • Blog
    • Articles
    • How to … & Tutorials
    • Make-up brushes & tools
    • Nails
    • Product Reviews
  • Contact
  • T&Cs
    • Refund and Returns Policy
    • Terms & Conditions
  • Press

Smokey Eye make-up tutorial

June 17, 2016 | How to ... & Tutorials | Leave a Comment

Up in Smoke

Welcome to “Up in Smoke”, my step-by-step Smokey Eye make-up tutorial.

We begin by starting with cleansed, lightly moisturised skin. I like to use a skin primer as I have oily skin and fairly large pores and a primer helps to disguise this. I applied a small amount of Innoxa Pure Silk Skin Primer, patting it on gently and then waiting a few minutes before applying my foundation and powder (Powder is optional, not everyone likes to use it. If you prefer a “dewy” look, skip it. If you have oily skin, it’s a must to set your make-up and help absorb excess oil).

Free Stock Image: unsplash.com

Onto my eyelids. First, I applied e.l.f. Shadow Lock Primer and waited a minute or two for it to dry before applying a nude, flesh coloured eyeshadow from lashline to brow, this will act as a base for the coloured shadows. I’m using Coastal Scents 88 Colour Warm palette which doesn’t have any colour names printed on them but I’ve used a shade closest to my natural skin tone.

Next, I apply a shimmery light grey to the entire lid area, using an eyeshadow brush and then blend it well into the crease using an e.l.f Blending Brush.

Using a dark grey, apply this to the crease and blend it into the lighter grey, once again using the Blending Brush.

Place a small amount of shimmery white eyeshadow under the arch of the brow and blend well. This will act as a highlighter.

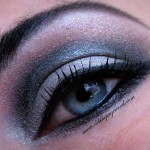
Using an angled brush, line the upper eyelid right along with lash line with black gel eyeliner (liquid eyeliner could also be used). I used Bobbi Brown’s Long-wear Gel Eyeliner in “Black Ink”.

Line the waterline (the area above the lashes on the lower lid) with a black pencil eyeliner. If you have small eyes and want to make them appear bigger, use white eyeliner on the waterline instead of black and apply the black eyeliner slightly under or in between the lower lashes.

Finally, apply a few coats of mascara to your lashes and fill in your brows, if necessary.

Share this:

  • Click to share on Facebook (Opens in new window) Facebook
  • Click to share on X (Opens in new window) X
  • Click to share on Pinterest (Opens in new window) Pinterest
  • Click to print (Opens in new window) Print

Reader Interactions

Leave a Reply Cancel reply

You must be logged in to post a comment.

ramblingrosenails

đź’… By appointment only.
đźš« No under 16s.
Closed on Wednesday & Sunday.
Book online:

All the products available in salon are listed onl All the products available in salon are listed online, including the Reniu range by Pure Fiji.

Order online and have it delivered, or arrange a collection time. 

Prefer to shop in-person? Feel free to browse after your appointment has finished, or book a 15 minute shopping time using the online booking system:  https://www.fresha.com/a/rambling-rose-nails-and-make-up-mangawhai-thelma-road-north-i1d1r1d4/booking?menu=true&dppub=true&employeeId=450913&pId=142955

 #shoponline #reniubypurefiji #HandcraftedItems
French Ombré doesn't have to be pink and white - I French Ombré doesn't have to be pink and white - I can do them in any colour.

 #frenchombre #frenchombrenails #frenchombremani #bluefrenchombre #greenfrenchombre #pinkfrenchombré
If you’re looking for one product that’s affordabl If you’re looking for one product that’s affordable, gentle, natural and yet a very effective way of removing all your make-up – eyes, face and even waterproof mascara – then you need to try the oil cleansing method.

Oil cleansing is suitable for all skin types, but the ratio of castor oil to vegetable oil will vary depending on your skin type. Using the wrong ratio will result in drying your skin out.  Read the full article:  https://www.ramblingrose.co.nz/the-oil-cleansing-method/ 

#oilcleansingmethod #oilcleansing #castoroilcleansing
Seen something you like on social media? Bring th Seen something you like on social media? 
Bring the pic in to your appointment and I'll do something similar for you.

Don't forget to add the additional nail art option if you're wanting nail art - I'll need the extra time added to your mani appointment.

 #ombrenailart #nailart #nailartwithpigments
Every pedicure, whether it's a classic pedi, gel p Every pedicure, whether it's a classic pedi, gel polish or traditional polish, includes a foot treatment and massage.

 #pedicure #pedicurewithmassage #collagenfoottreatment
Like to plan your manicure in advance? Gel polis Like to plan your manicure in advance? 

Gel polish colours, pigments, nail art foils, decals and stamping designs can all be viewed online - they're in separate album folders on Facebook:  https://www.facebook.com/ramblingrosenails/photos_albums

 #bluenails #dandelionnails #shimmerypigment
When clients book at Rambling Rose, they're sent a When clients book at Rambling Rose, they're sent an email confirmation of their appointment (so make sure you provide a valid email address that you actually use). An email reminder is automatically sent 24 hours before the appointment, and an automated text reminder one hour before the appointment starts. 

Simply not showing up for an appointment is just rude. 

A quick text to let me know you're running late or cannot make it will suffice - I often have people on a waitlist, able to fill an appointment at short notice.

 #becourteous #bereponsible #dotherightthing #whyicharge
If you're a fan of glitter, I've added three more If you're a fan of glitter, I've added three more glitter polishes to the collection. These can be applied on top of any other colour, or worn on their own.

This is 'Greed,' a green glitter, over the top of 'Rogue Vogue' a pastel green. 
(Please excuse the regrowth - in the crazy back-to-work rush I forgot to take a pic when they were freshly done).

 #greennails #greenglitter #artisticcolourglossgreed #artisticcolourglossroguevogue
Did you know that nail techs in New Zealand are no Did you know that nail techs in New Zealand are not legally allowed to cut live skin.
 
Removing live skin or cutting the eponychium (often mistaken for the cuticle - the thickened skin around the base of the nail where it joins the finger) is classed as minor surgery and can expose clients to increased risk of infection. 

I've often had clients ask why it doesn't hurt when I remove dry skin around their nails, and yet when they've had it done elsewhere it's been sore. The difference is I'm only removing dry, dead skin cells. I'm not removing any living tissue or skin still needed by your nails or fingers. 

A qualified nail tech should know the difference. 

 #qualifiedvsunqualified #minorsurgery #cuttingskin
Nail art doesn't have to be brightly coloured, it Nail art doesn't have to be brightly coloured, it can be simple and understated but still eye-catching.

Blue and white orchids on the left hand, blue and white lilies on the right hand. 

 #orchidsandlilies #orchidnailart #lilynailart  #blueandwhitenails
Follow on Instagram

Copyright © 2026 · Rambling Rose