• Skip to primary navigation
  • Skip to main content
  • PRICE LISTS
    • PRICE LIST: NAILS
    • PRICE LIST: MAKE-UP
  • CONTACT
  • SHOP
  • TESTIMONIALS
  • FAQ
    • Nails FAQ
    • Make-up FAQ
  • T&Cs
    • Refund and Returns Policy
    • Terms & Conditions
  • Nav Social Menu

    • Facebook
    • Instagram
    • Pinterest
  •  

Rambling Rose

  • Price Lists
    • Nails
    • Make-up
  • Shop
  • Blog
    • Articles
    • How to … & Tutorials
    • Make-up brushes & tools
    • Nails
    • Product Reviews
  • Contact
  • T&Cs
    • Refund and Returns Policy
    • Terms & Conditions
  • Press

Pot o’ Gold nail art tutorial

March 9, 2016 | How to ... & Tutorials, Nails | Leave a Comment

St-Patricks-pot-o-gold 
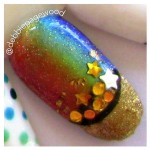
I’ve had a few requests to do a step-by-step tutorial for one of my most recent St Patrick’s Day nail art designs. This is my first step-by-step nail art tutorial, so please leave a comment if you have any questions. Here goes:

• Before you begin painting your nails and doing the nail art, you need to prep your nails by cleansing them well with nail polish remover to get rid of any old polish and natural oils on the nail plate.
• Shape the nail to the desired shape with a nail file and gently brush away any excess dust.
• Gently push back your cuticles using a cuticle pusher or the flat end of an orangewood stick (orangewood sticks are available from Dollar stores or in beauty section of your local department store) and use the pointy end to gently remove any cuticle residue left over on the nail.
• Lightly buff the entire nail surface with a 180 grit buffer (this is usually the rough side on a buffing block). Do not use a nail file for this step, as its too rough and will damage your natural nail. Brush away any excess dust.
• Cleanse the nail again with nail cleanser (or nail polish remover) to remove any natural oils that have come to the surface of the nail.
• Apply Artistic pH Prep to dehydrate the nail plate.

• Apply a thin layer of your base coat, making sure to cap the free edge (this means painting the tip of the nail, for those who are not nail techs and will be trying to recreate this with whatever products they have on hand). I use Artistic Bonding Gel and cured it in an LED lamp for 10 seconds before dry brushing the sticky inhibition layer.
• Apply a coat of Artistic Colour Gloss in “Bride” (white) to the nail, capping the free edge and cure in an LED lamp for 30 seconds.
• Apply a second coat of “Bride” and cure for 30 seconds.

• Using the Be Creative Brights pigments 6-pack and a small, stiff bristled brush, apply a little “Bikini” (pink) in a stripe to the outer edge of the nail, from cuticle to just where the free edge starts (the growing white “tip” of the nail).
• Still using the Be Creative Brights pigments, work across the nail, slowly adding stripes of “Ice Pops” (orange), “Sunshine” (yellow), Cut Grass (green), “Ocean” (blue) and “Flip Flops” (purple), blending the edges of each colour where they meet.
• Using a dry fan brush, gently dust off any excess pigment.
• Apply one coat of Artistic Colour Gloss in “Halo” (this is sheer, gold-tinted clear polish with a holographic glitter sparkle) and cure in the LED lamp for 30 seconds.

• Using Artistic Colour Gloss in “Goddess” (gold), paint a circle at the tip of the nail, making sure it meets where the pigments end. This will become the pot at the bottom of the rainbow. Cure for 30 seconds in the LED lamp.
• Apply a second coat of “Goddess”, if necessary, and cure.
• Using the Be Creative Orange mini striper brush and a little Artistic Colour Gloss in “Empowered” (charcoal grey), outline the top edge of the circle, where it meets the pigments, to form the back of your pot and then draw an inverted mirror image of that line (across the middle of gold polish) to form the innermost edge of your pot.
• Cure for 30 seconds in an LED lamp.

star glitter• Stick your choice of gold diamante, gold stars or gold glitter, foil, etc. into the opening of your pot to create your pot of gold.
• Finish the design with one coat of Artistic Glossing Gel (top coat) and cure for 30 seconds in the LED Lamp.
• Wipe off the sticky inhibition layer with a lint-free wipe and nail cleanser.
• Apply cuticle oil to each cuticle and massage it into the nail and surrounding skin.

Please see my previous post “Maintaining your Manicure” for tips on how to keep your manicure looking good for longer.

Share this:

  • Click to share on Facebook (Opens in new window) Facebook
  • Click to share on X (Opens in new window) X
  • Click to share on Pinterest (Opens in new window) Pinterest
  • Click to print (Opens in new window) Print

Reader Interactions

Leave a Reply Cancel reply

You must be logged in to post a comment.

ramblingrosenails

💅 By appointment only.
🚫 No under 16s.
Closed on Wednesday & Sunday.
Book online:

To all the volunteers in Mangawhai, thank you for To all the volunteers in Mangawhai, thank you for all that you do.

- Mangawhai Volunteer Fire Brigade (@mangawhaifirebrigade)
- St John's Ambulance (@stjohnnz)
- those who volunteer at Te Whai or the Museum (@tewhaicommunitytrustmangawhai and @mangawhaimuseum )
- and everyone else who gives freely of their time to help those in need

 #InternationalVolunteerDay #internationalvolunteerday #internationalvolunteerday2025
Photos don't do this room justice. All the retai Photos don't do this room justice. 

All the retail items that are available in salon are also all available online through our website:  www.ramblingrose.co.nz/shop

If you're stuck for gift ideas for Christmas, have a browse through the Reniu by Pure Fiji products, or find an item of jewellery, and have it delivered to you or sent directly to the recipient via courier. 

 #shoponline #purefijinz #purefijiproducts #reniu #reniubypurefiji #nailsbyappointment #mangawhainailtech #ramblingrosenails
'Hotness,' a glittery red that reminds me of Dorot 'Hotness,' a glittery red that reminds me of Dorothy's shoes in the Wizard of Oz, with stars, baubles and a Christmas tree. 

This set can be done in any combination of colours. 

Gel polish mani + nail art = $85

👩‍💻 Book online: https://www.fresha.com/a/rambling-rose-nails-and-make-up-mangawhai-thelma-road-north-i1d1r1d4/booking?menu=true&dppub=true&employeeId=450913&pId=142955
📍  Mangawhai Heads
📖  By appointment only
🚸  No children under 16 allowed in the salon.
🧴  Strict hygiene routine
🎓  Fully qualified nail tech with over 10 years experience 
🌹  Tranquil location 

 #christmasnails #christmasmani #christmasnailart #glitteryrednails
The salon will be closed from 23 December 2025 and The salon will be closed from 23 December 2025 and will reopen on 8 January 2026.

I'm already fully booked from 13 December onwards, and the first week in January is filling up fast. If you haven't already booked your December and January appointments, do it soon otherwise you may miss out.

 #closingforchristmas #endofyearshutdown #endofyear #takingabreak
Often, I don't get to see the final effect with th Often, I don't get to see the final effect with the outfit (weddings or school balls), and I love it when I'm sent a photo. 
Thank you. 

 #schoolballmakeup #makeupartist #makeupartistmangawhai
How is it December? Where did the year go? #dec How is it December?  Where did the year go?

 #december #wheredidtheyeargo #christmasisaroundthecorner
In the same way as certain lipsticks, eyeshadows a In the same way as certain lipsticks, eyeshadows and other make-up colours suit certain skin tones, the same applies to nail polish shades.

Not sure what colour to get? Not to worry, I'm happy to help you choose once your nail prep has been done. My colour swatches are used to try the colour on before your nails are painted. 

 #nailpolishcolours #colourswatches #skintone
Snowflakes on your nails in December? Yes or no. Snowflakes on your nails in December? Yes or no. 

 #snowflakenailart #christmasnails #redgoldwhitenails #christmasnailart #sparklynails
Pushing back your cuticles are part of the prep be Pushing back your cuticles are part of the prep before painting during a manicure. This process removes any dead skin cells stuck to the nail plate before polish is applied. Doing this improves the longevity of your manicure. 

 #Cuticles #cuticles #NailPrep #nailprep #nailpreparation #cuticlework
It's that time of year ✨⛄❄️🎁🎅 #christmasnails #c It's that time of year ✨⛄❄️🎁🎅

 #christmasnails #christmasnailart #redgoldwhitenails #sparklynails
Follow on Instagram

Copyright © 2025 · Rambling Rose